

AdMosLive sensors are automatically updated over the air (OTA) by Insiders. Therefore, you do not need to do anything, just use the sensors as usual.
While using AdMosLive sensors for a sport session, the OTA update process will start automatically if needed.
Then, the sensors will have the latest version for the next time.
For your information, find below how the OTA update is automatically launched:
- Before your sport session, turn on the sensor by pressing the power button once
- Both LED lights,
 and
and  , will be blinking green alternately when fully connected. You can start your sport session
 - While connected, the sensor will communicate with the server about the version
- After the sport session, turn off the sensor by pressing the power button three consecutive times. The LED light will turn red
- While the sensor is turning off, the latest version will be downloaded by the sensor if needed. The LED light will be blinking red (white, depending on the version)
- The latest version will be installed while the sensor is plugged in to charge. This avoids eventual issues due to low battery
- During the update, the LED light will be blinking red (white, depending on the version)
- Once installed, both LED lights will be off
Note: if the sensor is not able to connect to the network; ![]() LED light is never blinking green, move the sensor to a location where it can get a better mobile network connection.
LED light is never blinking green, move the sensor to a location where it can get a better mobile network connection.
If the sensor is unable to update automatically over the air (OTA) due to a lack of mobile network connection, or OTA server down, etc., the update can be launched manually using the Updater tool. Note: Currently, the Updater works only on Windows computers.
- First download the Updater tool
- Extract all the content of the “updaterXYZ.zip” file you downloaded previously
- Open the folder “update”
- Then double click on “Update.bat to run the Updater tool
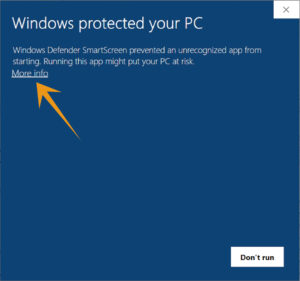
- Windows Security might display the following message
- Click on “More info”
- Then click on “Run anyway”
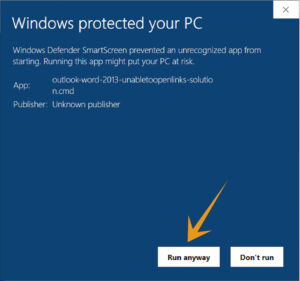
- This same Windows Security message might appear twice.
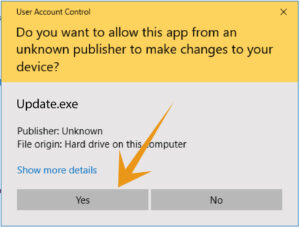
In this case, click again on “More info” and then on “Run anyway” - Then Windows might ask you if you want to allow this application, please click “Yes”
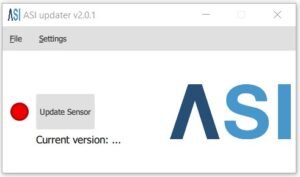
- Now the Updater tool is launched
- Connect the sensor to your computer with the USB cable
- A pop-up at the bottom right of your screen will show the sensor is connected

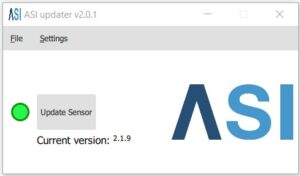
- On the Updater tool, the green dot confirms that the sensor is connected.
- Press the “Update Sensor” button
- While updating, a progress circle will be displayed
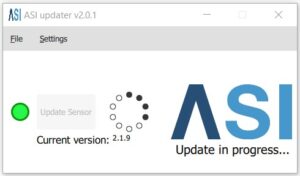
- Warning: do not unplug the sensor while the update is in progress, otherwise an error message will be displayed. In that case, you have to restart the update procedure

- When the update is completed, a pop-up confirmation will be displayed

- Once the sensor is updated, you can close the Updater tool, unplug the sensor
- Restart your AdMosLive sensor to complete the firmware update
- You can now start using your AdMosLive